By John A. Miller
 A Confederate soldier impression is
one of the most rewarding and challenging impressions one
can do. With so many different uniform options depending on
theatre, equipment accouterments and personal items out
there on the market and it can be very frustrating to the
green hand of the hobby. This is why researching your
impression first is essential before making any purchases.
No matter what time period one decides to portray, it takes
time, money and effort to put the general kit together. By
working hard and doing several hours of research, you can
achieve your goal of historical authenticity.
A Confederate soldier impression is
one of the most rewarding and challenging impressions one
can do. With so many different uniform options depending on
theatre, equipment accouterments and personal items out
there on the market and it can be very frustrating to the
green hand of the hobby. This is why researching your
impression first is essential before making any purchases.
No matter what time period one decides to portray, it takes
time, money and effort to put the general kit together. By
working hard and doing several hours of research, you can
achieve your goal of historical authenticity.
Civil War re-enacting is one of
those hobbies where your rewards come from what you put into
it. The more research you do and the better educated you
are, the better your impression is and that provides you
with a better opportunity to properly educate the public.
The same would apply for any time period. It is very
discouraging to see the majority of mainstream re-enactors,
as well as green hands that are getting into the hobby
buying stuff they do not need or is made incorrectly.
Instead, they purchase the items because they liked it or
they thought it was correct without doing the proper
research first, this is where the new recruit gets into
trouble. There are several great resources out there that
are devoted to historical accuracy. Keep in mind that in
this hobby in order to educate the public, you must first
educate yourself.
One term that a new recruit will
hear is the word "Farb". What does that mean? Farb is the
term that is given to someone who doesn’t do their research
on the authenticity of their impression or cuts corners. For
example, the term "farb" could apply to a person who wears
East German jackboots instead of artillery boots, modern
dress pants instead of period correct trousers, or someone
who purchased something that is not correct for the
impression they are portraying. It can be a person who has
the wrong style jacket when the unit they are with calls for
a certain issue or someone who doesn’t take all the
necessary steps to be as authentic as they should. Believe
me, I’ve seen this first hand. There are literally hundreds
of resources one can use to research their impression such
as photographs, letters and books that describe uniforms.
Another avenue of valuable research is the “Echoes of Glory,
Arms and Equipment of the Confederacy” to research your
impression and other uniform needs. This will give you a
clue as to how it was made, where it was worn and when it
was used. Find photographs of Confederate soldiers, study
the photo and ask yourself how I can look like that.
Remember, research is non-stop, every year new resources
arise and uniforms and equipment should always reflect any
significant findings.
One of the worst impressions I have
ever seen was a teenager re-enacting with a Mississippi
unit. His uniform consisted of a modern day light tan slouch
hat with a purple wool hat cord, a greenish shell jacket
with Virginia buttons, Federal sky blue trousers and knee
high officer boots with the trousers tucked into the boots.
This is what I call farby. This person had never bothered to
study what the average Mississippian wore and never invested
time into researching his impression. It never hit him that
he was being laughed at by others around him including
members of his own unit. However, all of the blame does not
lie on the individual, the unit is at fault here as well
because they should have been working with this person in
order to better his impression.
I would like to explain a few
things that the new recruit to the hobby should do in order
to help with or improve his impression. The first rule of
thumb should be this: What you pay for is what you get. The
worst part is when you buy an item and you find out later
you can’t use it because it’s not authentic or it's cheaply
made. That’s why I can’t stress this enough, do your
research first. The best thing for the newcomer to do first
is to find a unit. Each unit has a set of guidelines or what
is known as "Authenticity Standards" of what the enlistee
can and cannot wear. For example, you don’t want to buy a
frock coat if the unit you are joining requires a Richmond
Depot jacket. And you don’t want to buy a North Carolina
sack coat, if the unit guidelines state you need a Columbus
Depot.
Another thing I would like to
explain to a new recruit is the fact that most mainstream
units choose a generic mid war time period to portray. While
this is a great base uniform to have, the down fall is that
when they set up their guidelines for an 1863 impression it
leaves out 1861 and 1862 as well as perhaps 1865. I have
witnessed this with New Market. Men take to the field
wearing frock coats or Richmond Depots Type I's when they
should be wearing a Richmond Depot Type II or even a
Richmond Depot Type III jacket. This is what happens when
you set your guidelines for one certain time period, it can
leave you going to events that might require something other
than 1863 uniform requirements.
Several reputable units do have a
strict uniform standard that tells you everything you need
and what time period it is to be used for. For example:
early war impression, one would acquire a Commutation
Jacket, Richmond Type I or a frock coat. Mid war impression
that same unit would require you to purchase a Richmond
Depot Type II jacket, late war requirements would be a
Richmond Type III or maybe even a Peter Tait jacket. These
requirements are spelled out in which order you need to
acquire them from uniforms to equipment. Many of these units
tell you not to buy anything up front without seeking the
advice from a veteran of that particular unit. When this
happens, it makes getting into this hobby easy and fun.
However there are several units whose standards are not so
simple and leave too much room for guessing.
When you decide what impression you
want and what fits your unit guidelines, you need to go to
quality sutlers that sell quality goods. For example, when I
decided to do a first hand impression of one of my ancestors
who had served in the artillery in the Army of Northern
Virginia, the first thing I did was read about the unit’s
history. I then studied photographs of the uniforms and read
all of the descriptions that I could find. After my research
was done, then I went on my search to find the quality and
authentically correct items I needed. Studying where to buy
period correct items is a must.
The rest of this article is just an
example that is based on the average soldier serving in the
Army of Northern Virginia. This article should serve as just
a guideline only. I too was a new recruit and have been with
a few units that just hand you a list and say go shopping.
No examples were ever given to me about jackets or trousers
and what to look for in quality items. I had to research
that aspect first. It's been over a decade since I first
came into this hobby. As a result, my impression has
continued to evolve reflecting what I have learned and
applying that knowledge to my own uniform standards.
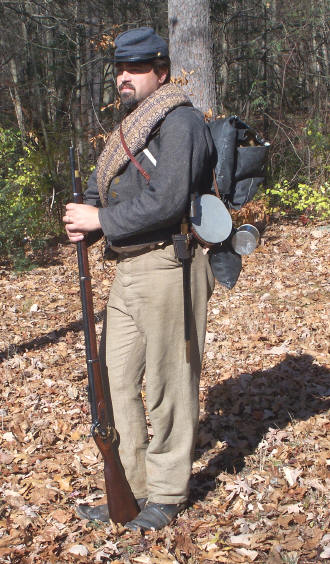
Jackets are the first thing people
see when you are dressed in uniform. Remember, most
Confederate jackets were hand stitched. Most jackets of the
period were made from Jeans-cloth, Cotton-Jeans, Satinette
and Cassimere. Wool would be another option, however with
wool in short supply, it was cheaper to make jeans-cloth
uniforms, so therefore jeans-cloth was much more common.
Jeans-cloth is a cotton and wool mixture and it required
less wool and was more durable than satinette. Jeans-cloth
was also used for everyday work clothes for civilians during
the Civil War time period. Mid to later in the war, British
Army Cloth and English Kersey garments were commonly issued
to Confederate troops in Lee’s Army.
Buttons are the next thing people
see. Make sure you have the proper buttons on the jacket.
State seals are good for an early war impression, but many
of the jackets had wooden buttons, Block (I, C or A)
buttons, and some even had Federal eagle buttons. Coin
buttons are very sharp to have on a jacket as well. One of
my jackets I wear has copper coin buttons sewn to it.
The Richmond Depot jacket was
commonly issued to troops in the Army of Northern Virginia.
There are a few alternatives you may wish to pick up after
your primary jacket is bought if your unit is portraying a
non-Virginia soldier. The North Carolina shell jacket or a
Georgia jacket would be my number two choice. People often
don't realize that other states issued clothing to non-state
troops. If you are doing an early war impression I would
strive for a frock coat or a Richmond type I jacket.
For a mid war impression I would
pick up a Richmond Depot Type II jacket. The Richmond Depot
Jackets were made from a six-piece body, two-piece sleeve
pattern and featured nine buttons with shoulder straps and
occasionally belt loops. During the middle of the war this
style jacket was issued plain, meaning that no colored tape
was applied, however the soldier could decide to apply the
tape himself in the field. Another thing you can do to
improve your Richmond Depot Type II Jacket is to simply add
black or dark blue tape to the collar and cuffs. This will
give you an early to mid war appearance. The stitching
doesn't have to be perfect. Sometimes soldiers cut off the
epaulets giving the Richmond Type II jacket the look of what
would become the Richmond Depot Type III jacket. Later on in
the war, the Richmond Type III jacket became common issue.
The important thing to remember is that Richmond Depot Type
III jackets were made from English Kersey in the bluish-gray
color. Very rarely did you see a Richmond Depot Type III
jacket made from gray wool or jeans-cloth.
Another option you have would be a
simple jeans-cloth, wool or satinette shell jacket. These
jackets were known as the cloth saving jacket. Private
tailors, women and other contracted businesses, easily made
them. These jackets are very similar to the Richmond Depot
jackets in appearance. Most of these jackets were accepted
as commutation, meaning that the Confederate government
reimbursed the soldier or state issued that issued them.
These jackets often feature trim such as tape or solid
colors on the collar and cuffs. The button pattern could
have featured any style of buttons in a six to eight pattern
front. Or you may want to pick up a four-button coat in what
many refer to as the sack coat. This is more of a generic
look for a Confederate soldier, with that in mind, some
units still require the enlistee to buy his Richmond Depot
jacket first. Research your jacket options using the “Echoes
of Glory, Arms and Equipment of the Confederacy”.
I know when you arrive in
Gettysburg to make your long awaited and researched
purchase, you’ll be tempted to buy the so-called "Fresh Fish
Package" to save a few bucks. The set includes a sack coat,
vest, trousers and a shirt. Before you buy it just remember
that many units don’t allow sack coats. It sounds like a
great deal, but double check your unit’s guidelines before
you buy and keep in mind that most sack coats that are sold
as part of these packages are made incorrectly. Another
problem with the “Fresh Fish Package” from mainstream
sutlers is the fact that in the long run you are not saving
as much as you think. It’s always harder to see uniforms
being sold separately and then you see the whole kit for
$400.00 and think “wow what a deal” when really its not. If
anything you’re saving about $10.00 to $20.00. That right
there should tell you something. Don’t let the sutler sell
you something that doesn’t look right to you or doesn’t meet
your unit’s authenticity guidelines. You and your unit know
what is appropriate and what’s not, so be sure to ask
questions. Most quality sutlers often have resources that
they will be glad to share with you in order to help you to
establish your impression and will not sell you something
that you do not need. If they do, then shame on them.
If you can’t afford to buy an
authentic jacket for $250.00 versus an incorrect jacket for
$100.00, there is a cheaper route to go. Most quality
sutlers online sell kits for under $100.00. These kits
include fabric that is precut to your size along with
detailed instructions with photographs, buttons, wax for
your thread and thread. The only down fall to this is that
you have to hand sew it together. Most people know someone
who can sew in their family. These jackets can take about
one to two weeks to construct. When the product is finished
you have yourself a real nice authentic jacket and the
appreciation of knowing what people did in order to clothe
their soldiers.
Waistcoats or a military vest as
some call it was a non-issued item, but rather a private
purchase. So this should be up to the unit you are with to
say if you need it or not. If you don’t need it right away,
then save yourself the money and use it for something else
that you do need.
Shirts are one of your basic needs.
There are many different types of material used to make
shirts. You have cotton, linen and wool flannel to name a
few. Your plain wool flannel shirts are more for your
military impression. Other patterns and colors are more for
your civilian type. Many units let you decide on what kind
of shirt you want. Wood or bone buttons look great on shirts
and are appropriate as well.
Trousers are pretty simple. You
have the standard military depot or civilian styles. The
buttons should be made of wood or bone. The military type of
trousers you have determines which depot system in the south
issued them. Two most common types of trousers you see in
re-enacting determine how they are closed in the back. Some
have two straps that are adjusted by a single buckle, while
the others have two holes with a piece of leather or twine
to tie the back closed. Some trousers have none of these
features. One thing to remember when wearing your trousers
is the fact that if you look at the photographs of soldiers,
you’ll notice that the men in those days wore their trousers
at their natural waist or for a lack of better words up to
their belly button. Most units recommend that you buy the
Depot Type trousers, not Federal issue sky-blue wool
trousers. The Confederate Depots made sky-blue trousers from
their own pattern that is totally different than the Federal
issue and often produced them using English Kersey. Another
avenue you can use is the civilian style trouser. Remember
trousers, just like jackets are made from various materials
such as jeans-cloth, satinette, and also cotton.
Choosing your headgear is the next
decision you will need to make. The most common headwear is
a kepi or a slouch hat, but again check with your unit’s
guidelines before you make your purchase. Different types of
kepis include the forage kepi that is very baggy on top and
the standard French style kepi. Again, study the
photographs. If you buy a slouch hat, remember that you
don’t want just a regular style cowboy hat. Be sure that the
slouch hat you are buying is a period correct civilian style
in the right color, lined and constructed with the correct
material. Remember, your headgear is going to be another
main feature of your uniform that other re-enactors will see
and it could become your trademark.
One of your most essential items is
your canteen; you cannot take to the field without one. Most
units will allow any type of canteen as long as it is period
correct. Some choices you have are the wooden drum, CSA tin
drum, the Federal model 1858 smooth side canteen, or “bulls
eye” Federal canteen. Smooth side canteens need to be lined
on the outside with jeans-cloth material. Wooden drum
canteens were often replaced in the Civil War for the
Federal canteen, until the depots in the South started to
make canteens made of tin. Tin was a cheaper material and
any tinsmith could produce these canteens in mass
quantities. Canteen straps should be cut low and hang just
touching your left elbow. This was done for comfort on the
march. The strap should be made of cotton. When purchasing a
canteen, remove the chain that attaches the cork and replace
it with hemp twine.
A haversack is a very handy item to
have. In the Confederate Army the plain white cotton cloth
haversack was very commonly worn, however there were painted
black haversacks that were issued to the soldiers. The
straps are usually 40 inches long and should be worn at your
belt line with the top just touching you left elbow.
Haversacks are for carrying food such as meat, beans,
apples, vegetables and other food items.
Knapsacks are a vital item to have
as well. Many styles of knapsacks are on the market such as
the Federal style soft knapsack, the Kibbler,the English
import and the Isaac & Campbell to name a few. Knapsacks
were used to carry all of your non-essential items. The
knapsack is where you should keep your shelter half if you
captured one from the Federal army or blanket, gum-blanket,
two towels, two handkerchiefs, two pair of socks, an extra
shirt, under drawers, tin plate and eating utensils. Also
any small personal items should be carried in your knapsack
such as a housewife (sewing kit that contains beeswax,
needles, thread, scissors and patches), hygiene items such
as tooth brushes, tooth powder, razor for shaving, extra
hemp rope, journal with a pencil and a Bible. A nice
alternative to the knapsack is the blanket roll, where you
can roll all of your personal items in the blanket roll, tie
the ends together and sling it across your back. Your tin or
copper cup can be transported by tying it to the shoulder
strap of your knapsack or blanket roll. Most units allow you
to concentrate on the major purchases first before buying
knapsack stuffers.
Footwear for the re-enactor is
pretty basic. You have your choice between brogans, civilian
style work boots or boots. Brogans are more acceptable for
the average infantryman impression. The popular brogan to
buy is the Jefferson brogan. There are a few English styles
out there and they should work out as well with your
impression. Boots are more for artillery, cavalry and
officer impressions. It depends on your impression as to
what type of boot you will need. Remember, if you have a
pair of boots; make sure your trousers are worn outside of
the boot instead of being tucked inside. This is a common
misconception that your trousers should be tucked inside the
boots. This did occur, however there are very few
photographs to support that this was common practice during
the Civil War. The soles can be sewn on or pegged. During
testimonies in 1861, Congress asked private contractors in
congressional hearings why their pegged soled brogans were
falling apart at a much quicker rate than those sewn
together.
Socks are another standard item you
must have. There are a few good sutlers that sell period
correct cotton socks for the summer months, but beware of
those socks made of wool. Many mainstream sutlers sell the
same style of wool socks that are at Wal-mart in the
sporting goods department and try to pass them off as
authentic. One thing you do not want to happen is to sit
down and decide to cross your legs and have a bright white
modern day cotton sock showing.
The equipment you need to complete
your impression is fairly simple but very important. You
need an infantry belt, buckle, cap box, scabbard for your
bayonet and a cartridge box. Just make sure your cartridge
box matches the caliber of the rifle you want to buy and it
comes with the proper cartridge tins that are needed for
your rounds. Cartridge boxes are worn two ways. The first
way is having the cartridge box suspended by a cartridge box
sling or a belt, as some would call it. The other option is
to wear it attached to your belt. One idea that is not often
portrayed in re-enacting is English Army items, such as a
leather belt with the two-piece snake buckle and other
English accouterments. Both the Union and the Confederate
bought large amounts of English items. Painted cloth items
are another idea one might want to consider, as they tend to
be a little cheaper to purchase, as well as very easy to
make.
There is a major misconception in
mainstream re-enacting concerning cartridge boxes. Most
re-enactors do not find it necessary to match the type of
cartridge box with the caliber of the gun. For example,
using a 69 caliber cartridge box for use with a 58 caliber
musket. Most of the time, you were issued everything that
was required to fire your musket including a matching
cartridge box in the caliber of your musket. Another
important thing that is missing in the mainstream is the use
of cartridge box tins. I have inspected so many cartridge
boxes and more than half are just filled with cartridges, no
tins and the tool pouch on the cartridge box is always
empty. The tool pouch was used to carry your combination
tool for your musket, wiper (worm), bullet puller as well as
your tompion when its not plugged into the end of your
muzzle. Another valuable tool is your nipple (cone) pick.
Your cap box should have sheep wool located inside. Keep you
nipple pick located in there for easy access.
Leather belts are simple, but the
buckle can be tricky. Many units prefer the enlistee to buy
a roller or a framed buckle that is already sewn to the belt
rather than purchasing the CS oval, CSA rectangle or state
seal detachable type buckles. There are several styles of
belts one can pick from, but there are two main leather belt
options one can buy. Early war type belts have what is
called a keeper sewn to the end of the belt, and mid to late
war issued belts didn't have the leather keeper attached and
were finished in two ways. The first is known as buff, which
has a rough finish, and the other was smooth. Most
re-enactors will buy the later issue belts. Colors for the
most part are brown or black. Brown is the natural color
that was finished in oil rather than dyed black.
Your rifle will be your major
purchase for Civil War re-enacting. The most important point
of buying a rifle is to make sure that it is a three-band
rifle. The re-enacting officials have decided that two-band
muskets are unsafe to fire in close shoulder-to-shoulder
firing from the rear rank and it is against all event
regulations to have one in the ranks. Some of the choices of
muskets you have consist of the Richmond, Enfield,
Springfield and Harper’s Ferry models to pick from. Once you
have decided on a rifle, you’ll need a bayonet for the gun.
The best thing for the new recruit is to buy your rifle and
bayonet together, because you need to find a bayonet that
fits your rifle barrel the best. Most bayonets do not fit to
your gun when you purchase them. That's because when
bayonets are made, the company uses a one-size bit to hone
out the socket. The rifle barrel is a few thousandths of an
inch smaller at the top of the barrel and gradually gets a
few thousandths of an inch bigger as you work your way back
to the first band of the gun, so it is best to purchase a
bayonet that is a little bit smaller than the end of your
rifle barrel. You will have to take a half moon file or a
sanding wheel on a drill to the socket of your bayonet and
file it down until it fits your gun.
Some other important things to
remember is that if the unit you are joining fought with the
Army of Northern Virginia during the Civil War, that army
had its own set of standards of what could be issued as far
as uniforms. They were what you called a "Uniformed Army".
Even their flags had to be the same throughout the Army. If
you are joining a unit that fought in the Army of South
Western Virginia or the Department of South Carolina,
Georgia and Florida, they had their own standards that would
not be accepted in the Army of Northern Virginia. The same
goes for the other armies in the Confederacy.
When it comes down to it, you need
to do your research first in order to start your impression.
Even after you have established your impression, it is
something that you should continually try to improve and
don’t follow the mainstream trends. One flaw can be damaging
to your impression and your units reputation. Be sure to
talk with the unit historian or commander on what you can
and cannot have. I’ve talked to many new recruits from other
units that spent a considerable amount of money on items
that they could not use because they were not historically
correct for that unit. Another valuable tool you will need
to have is a good attitude. Remember, when you are in this
hobby you are representing actual soldiers and units from
the Civil War and you need to portray yourself as such. You
are educating the public about the events and people of that
time period so you want your impression to be as accurate as
possible in order to correctly educate the public.