|
A Spouse's Guide to Building
the Perfect Rain Barrel System
Mike Hillman
Master Gardener Spouse
There’s nothing like a drought to raise one’s awareness of just how precious water really is.
With water just a twist of a tap away, it's easy to feel complacent while watching news footage of sun parched arid lands. But as we enter into our forth year
of drought conditions, with the heat index often in the high nineties, and with fields and lawns now brittle and brown, it's becoming harder and harder to ignore, especially when one is
married to a Master Gardener whose life efforts are invested in two acres of gardens.
For the past few years, as she furthered her knowledge on ornamental horticulture, native plants,
and landscape and garden design at Long Wood Gardens and the New York Botanical Gardens, she's had to
reluctantly depend upon me to keep here gardens watered. Given my prior, less then stellar record with plants,
I
wanted to water aggressively, but was limited by my concern over the farm's well. Unwilling to accept any limitations on my ability to water, I set off to
research other sources of water.
|
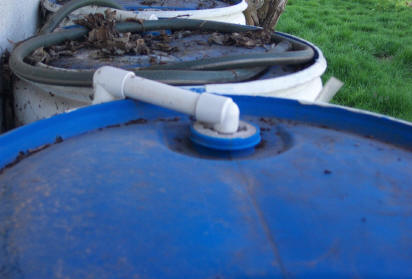
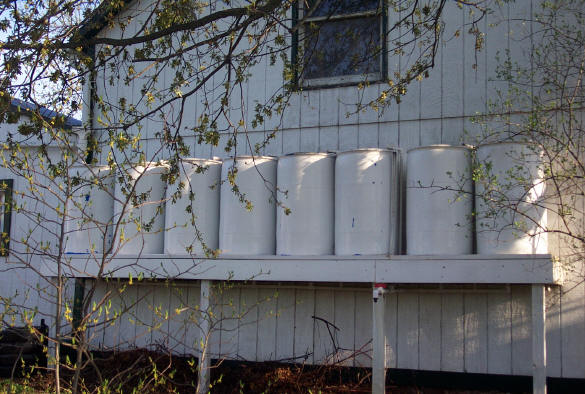
Overflow and vent pipe on top of every barrel
|
Since the beginning of recorded time, mankind has been using collections systems to gather and store rain water for future use, and while the appearance of
the systems has changed, the basic elements that make them up have not. All you need is a wide surface and a piping system to direct the water to the storage device.
Roofs and down spouts fulfill the first two requirements and are at the disposal of every homeowner, it’s getting a proper water storage device that trips up
most would be water collectors.
Trash cans are almost everyone's first choice. Readily available, that can be put into use with a minimal amount of effort or cost. However, lacking a proper
drain, they can only be emptied by having their owner's bend over and scoop the water out - a task which loses its luster after a few days. Not to mention the fact that the few
un-retrievable inches at the bottom of ‘empted’ trash cans forms the perfect misquote breading grounds ....
On the opposite end of the spectrum, there are many manufactured rain barrel systems on the market too chose from, ranging in price from $85 to $135 a barrel.
Considering a single 55 gallon rain barrel hold only enough water to maintain a four by ten foot garden for, at most a week, manufactured systems are a bit pricey for the committed
gardener.
For gardeners willing to put in a little sweat equity, there is a third path which will allow you to capture and store as much rain water as you want while
leaving your wallet virtually unscathed.
 The first thing you need to do is identify a source of food quality 55
gallon barrels. Manufacturers of fruit and soft drink products are an excellent source. And since in most cases the barrels are only allowed to be used once, manufactures are happy to see you cart off as many barrels as you can for free, or at most, at a minimal cost of a few dollars. (Manufacturers have to dispose of barrels as
hazardous waste as they are made of plastic, which is costly to them.) The first thing you need to do is identify a source of food quality 55
gallon barrels. Manufacturers of fruit and soft drink products are an excellent source. And since in most cases the barrels are only allowed to be used once, manufactures are happy to see you cart off as many barrels as you can for free, or at most, at a minimal cost of a few dollars. (Manufacturers have to dispose of barrels as
hazardous waste as they are made of plastic, which is costly to them.)
Most ‘do-it-yourself’ rain barrel instructions recommend you get barrels with removable tops for two reasons: so you access the inside of the barrel to
fasten your drain fittings; and, to allow you to clean out any leaves that enter the barrel.
I however, recommend you look for sealed barrels for three reasons. First, they are more plentiful; second, as you’ll soon learn, a plumber’s pipe tap will
allow you to fit a drain fitting without having to get inside the barrel; and third, instead of worrying about cleaning out the barrel - a simple down spout gutter screen will be
more then adequate to keep any leaves out of your barrel.
A word to the wise here ... don’t skimp on the number of barrels you bring home. I have more then 18 barrels scattered around my house holding 1900 gallons of
water - and my master gardener wife goes through them in three days just with regular watering of her multiple gardens.
Your choice of where you’re going to place the barrels will also factor in how many barrel you use. In selecting barrel placement, make sure you take
the time to look at the vegetation in the area. The chances are better the even that over the years the area has attracted water loving plants that will not look kindly on having
their water supply cut off. In cases like this, you might want to put in fewer barrels then you might originally want, thereby assuring the water loving plants get some runoff -
unless of course you don’t want the plants.
OK, now let get to building your perfect rain collection and storage system ...
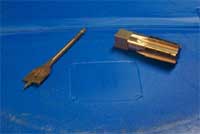 The first thing you need to do is turn the barrels over and using a 1 inch hole
saw, or paddle drill bit, cut a single hole in the bottom of each barrel - preferably near the edge. Next, contact your favorite plumber and ask if he has a 1 inch pipe thread and
would mind cutting a few ‘threads’ in a rain barrel for you. Since it only takes 30 seconds a barrel, if you’re a good customer, most plumbers will do it for free, epically if you
take the barrels over to their shop. [Note: If you can't find a plumber with the 1" pipe tape, if you're local drop me a line at
michael@emmitsburg.net I'll send you
mine, all I ask is you send it back!] The first thing you need to do is turn the barrels over and using a 1 inch hole
saw, or paddle drill bit, cut a single hole in the bottom of each barrel - preferably near the edge. Next, contact your favorite plumber and ask if he has a 1 inch pipe thread and
would mind cutting a few ‘threads’ in a rain barrel for you. Since it only takes 30 seconds a barrel, if you’re a good customer, most plumbers will do it for free, epically if you
take the barrels over to their shop. [Note: If you can't find a plumber with the 1" pipe tape, if you're local drop me a line at
michael@emmitsburg.net I'll send you
mine, all I ask is you send it back!]
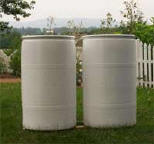 Next find a high quality paint primer that will stick to plastic, and then
paint them the color of your choice (in my case, I chose white). Believe me, while having a ready source of water will make your gardener spouse happy, not having them stick
out like a sore thumb and take away from the beauty of their garden will make them even happier, not to mention your neighbors. Next find a high quality paint primer that will stick to plastic, and then
paint them the color of your choice (in my case, I chose white). Believe me, while having a ready source of water will make your gardener spouse happy, not having them stick
out like a sore thumb and take away from the beauty of their garden will make them even happier, not to mention your neighbors.
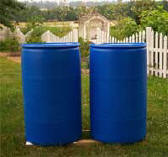
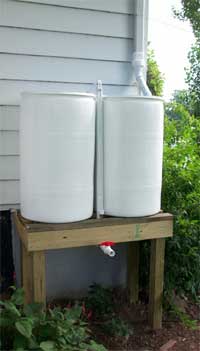
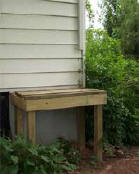 While you're waiting for the paint to dry, build the stands for the
barrels. A simple two barrel system like the one in the photo to the right only requires two 4x4x8 pressure treated posts and three 2x6x8 pressure boards. If your going to
build a four barrel system, use a 2x8 for the horizontal support. A good rule of thumb is to add 2" to the 'width' of the horizontal support for every 2 barrels you add. For
example, my eight barrel system uses a 2x12 for its horizontal support (with two extra vertical supports in the center.) While you're waiting for the paint to dry, build the stands for the
barrels. A simple two barrel system like the one in the photo to the right only requires two 4x4x8 pressure treated posts and three 2x6x8 pressure boards. If your going to
build a four barrel system, use a 2x8 for the horizontal support. A good rule of thumb is to add 2" to the 'width' of the horizontal support for every 2 barrels you add. For
example, my eight barrel system uses a 2x12 for its horizontal support (with two extra vertical supports in the center.)
Make sure your dig far enough down so the ends of the post site on 'solid'
ground, and then cement them in. I recommend building your stands first, then 'sinking' them into the ground - that way you can be sure the stand will be level.
While the paint is drying, head down to your local hardware store and pick up the following PVC parts you’ll need to connect your rain barrels:
[Note with exceptions noted by '*', all PVC components are per/barrel. So if you are building a four barrel system, get four of each of the components listed
below]
- ½ PVC parts (Used for the overflow vent)
- 1 - Male Threaded Connector
- 2 - 900 Elbows
- 4' of pipe
- 1" PVC parts:
- 1 - Male Threaded Connector
- 1 - 900 Elbow
- 1 - 3-Way ‘T’
- 1 - Ball Valve (threaded) (*per barrel system)
- 3' Pipe
- 3" PVC parts (*per barrel system)
- 2 - 450 Elbows
- 3' of pipe
- 1 Down Spout to Drain Pipe Connector
Other supplies:
- Clear PVC Glue
- Tube of Silicone Glue
- 1" Brass Hose Connecter
- 1 Jar of PVC Primer
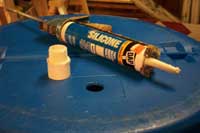
Once the plumber has cut the 'female' threads into the barrel, coat the threads of the male connecter with silicone, and using your hand, screw it in as tight as you can. Be careful! Don’t over tighten it or you might strip the treads of the barrel. Once set, the silicone will form a waterproof seal.
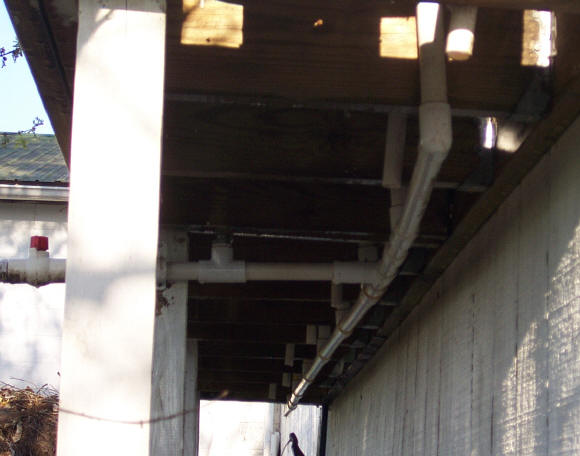
Next set the barrel in their place. If you're installing more then one barrel in a given location, connect them all together by cutting your 1" PVC pipe into lengths equivalent to the width of the barrel plus 2 inches. Using the ‘T’ connection, connect the top of the ‘T’ to the barrel connector. The two
remaining openings of the ‘T’ connect to the 'Ts' of adjoining barrels. ‘T’s allow you to connect an unlimited number of barrels together, only space limits the number of barrels you can connect. Make sure you use plenty of PVC glue when making the connections - and make sure the full surface area has glue on it by
giving the parts a quick twist!
[Note: I'm from the old school, and used to always sand the ends of my PVC pipes before gluing them. But today's building code expressly prohibits the practice of sanding the fittings first. Building codes require use of a primer (usually purple for PVC) before application of PVC glue. The reason is
that testing by professional societies and testing institutes has found that the scuffs from sandpaper can actually line up just right and cause a path that the cement cannot fill and be a path for water to leak. This usually only results when people don't do the proper quarter twist when assembling the parts. For the purposes of
rain barrels, it's 'six of one, half a dozen of the other' to say that purple primer is absolutely necessary verses sanding and no primer - but it's always good to use building code practices, and given it doesn't cost you anymore to meet the code, I encourage you to do so!]
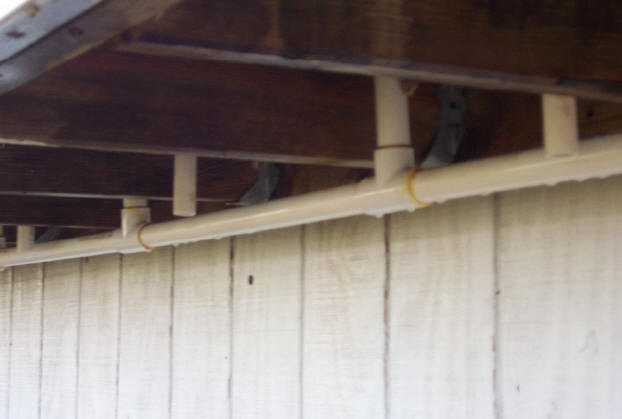
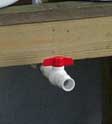 For your drain, tap into the common pipe somewhere in the middle (this way you
drain all barrels equally) using another ‘T’ connector. Cut and install an appropriate length of pipe to allow the valve to protrude a comfortable distance from the bottom of the
barrels. Connect the Ball valve to this pipe and then connect the brass hose fittings to the value. (If your only hooking up a single barrel, connect the drain pipe and ball valve
directly to the threaded male connector attached to the bottom of the barrel.) For your drain, tap into the common pipe somewhere in the middle (this way you
drain all barrels equally) using another ‘T’ connector. Cut and install an appropriate length of pipe to allow the valve to protrude a comfortable distance from the bottom of the
barrels. Connect the Ball valve to this pipe and then connect the brass hose fittings to the value. (If your only hooking up a single barrel, connect the drain pipe and ball valve
directly to the threaded male connector attached to the bottom of the barrel.)
With your barrel drain system now in place, it's time to hook them up to the down spout. Cut a six to eight inch length of three inch pipe and stick in into one of the
vent/fill holes at the top of the barrel. (Be careful when selecting which hole to insert the pipe in. Most barrels have two different threaded vent caps. One cap is solid, the
other has a threaded center hole in it that can be ‘punched out’ and fitted with a ½ PVC tap for use in directing the overflow. So if your can, place the pipe into the hole sealed by the
solid cap.)
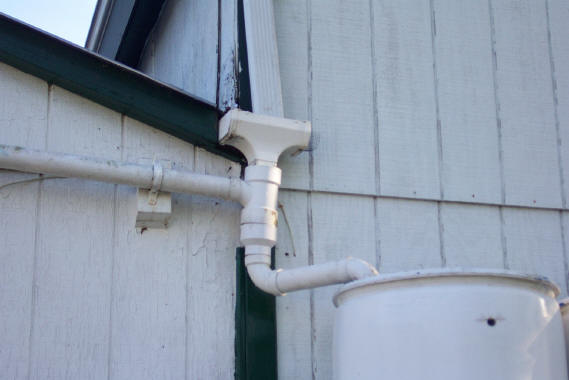
If the pipe doesn’t slide into the hole, use a rasp to widen the
hole. Cut another piece of three inch pipe of sufficient length to reach the down spot. Where the pipe meets the down spot, cut the down sport and install the down spout - drain pipe
connector. Connect the other 45-degree elbow to the drain pipe connecter and then connect the pipe to the barrel. (The 1 inch drain pipe connecting the bottom of the barrels will
serve to distribute the rain water to all the barrels, so you only need one connector to the down spot.) Before you put your ladder away, make sure you install the down spout
screen.
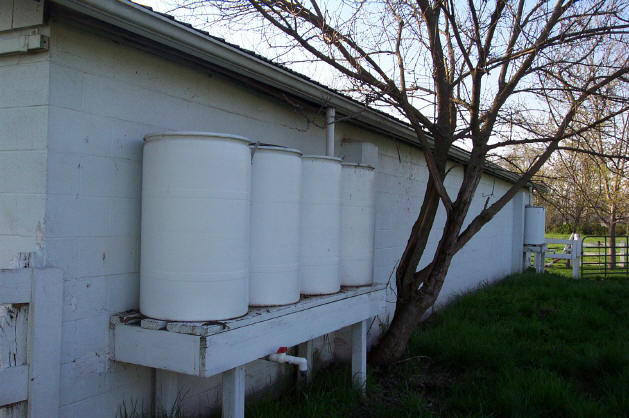
If your looking to 'wow' your neighbors or just maximize water pressure coming from the barrels, I strongly recommend you place your barrels on an elevated
stand, which can easily be built using a few pressure treated 4x4's and 2x6's. Elevated barrels also don't take up precious grading space and do form nice spots for shade
loving plants.
 Lastly, to help you want keep an eye on the water level in the barrels, a water level indicator can easily be made using simple clear tygon tubing. Connect
one end to a fitting taped into the bottom of one barrel. Secure the other to end of the tube to the top of the barrel using tape. The water in the tygon tube will equalize with that
in the barrel giving you an accurate reading. Lastly, to help you want keep an eye on the water level in the barrels, a water level indicator can easily be made using simple clear tygon tubing. Connect
one end to a fitting taped into the bottom of one barrel. Secure the other to end of the tube to the top of the barrel using tape. The water in the tygon tube will equalize with that
in the barrel giving you an accurate reading.
There you have it! Now all you have to do is sit back and wait for rain. A three-hour light rain filled our 18 barrels to overflowing. How quick your
barrels fill depends upon how large the collection surface you use.
While this might seem like a lot of work, if you do everything in a production like fashion, and you get all your parts in advance, it only takes an hour to
assemble everything and install a barrel.
As for your cost, excluding paint, each completely outfitted barrel will run you about 15 dollars. Far cheaper then any manufactured system. Of course the
difference between the manufactured system and the system described here is you do all the work in building it!
Read other articles on gardening in drought conditions Read other articles by Michael Hillman
Note: If you have any questions about how to build a rain water collection system, drop me a line at michael@emmitsburg.net
or
feel free to call me at 301-471-3306!
Frequently asked questions:
Question: I just installed 55 gallon drums (pickle barrels) pre drilled and plumbed with screened tops and overflow
spout and silcock at bottom. What I want to know is HOW MUCH WATER CAN I LEAVE IN THEM WHEN IT WILL BE 23 DEGREES F? I live in Durham NC, and this is their first winter. Will the
barrels split if I retain at least 25 to 30 gallons? Must I drain them completely from now till end of Jan when we no longer have below 32 degree nights???
Answer: Drain them 100%!!!!! I left some water in them once and came out the next morning and found them split right down the
sides. Make sure you fully drain the system, including the pipes that connect the barrels. Also I recommend you remove the downspout that flows into the 'fill' barrel to make sure
no water enters the system during months when your not using the system and freezing is a possibility.
Question: Do I need a diverter on the downspout, or can it just be a runoff pipe from the barrel system?
Answer: As far as the diverter - over overflow pipe, the 'vent' pipes at the top of every barrel serve that purpose, so
you don't need to add anything to the downspout. The vent pipes can handle any amount of water, event a three inch and hour rain!
Question: You describe raising the barrels on wooden frames. I've also seen concrete blocks. Reason for sticking with wood, or
is it just a personal choice?
Answer: I used a wood one because it provides an area under the barrels where you can store stuff, like brush, or even a
compost bin. The runoff from the overflow pipes flows into the compost bins which helps accelerate the composting. In addition, as the trees and shrubs near the down spout have long
ago placed roots to capture water there, by building the support out of wood, I didn't need to build a 'footer' for a block wall and thus did minimal damage to any root system, not
to mention, allow the existing roots to continue to 'soak' up water as they had in the past. In short, a wooden support was the most environmentally friendly for existing plants.
Question: I wonder about water pressure. I was going to hook a hose directly to the system (either by putting a hose bib right on the barrel, or some other way). I hadn't thought of elevating the barrel(s), but I can see the wisdom in that. But is water pressure a concern at all? How much
pressure does one get from the barrel(s) being, say, two feet off the ground? And have you experimented with stepping down the pipe size as you go away from the barrels? I understand that's how municipal water supplies achieve water pressure.
Answer: Regarding your question of water pressure - The pressure increase approximately half a pound per foot of elevation. To put that in perspective, standard water pressure in a house is between 15 and 25 pounds. But remember, water pressure at the end of the hose is based upon the
level of the water in the barrel. So if you have your barrel elevated four feet, then the top if the barrel is at seven feet. if you then place the hose on the ground, the difference in height is seven feet, giving you a pressure of three and a half pounds. While this doesn't sound like much, that's enough pressure to shoot a
stream of water over seven feet from the end of the hose, twelve feet if I hold my finger over the end.
Regarding your question of using of stepping down the pipe size as you move away from the barrel. Sorry, fluid flow dynamics work against you here. The flow of water in a pipe or hose, as well as the pressure at the end of them, is directly effected by the resistance the water encounters as it moves through them. Resistance
is directly proportional to the size of the pipe The smaller the pipe of hose, the greater resistance. So if anything, the father you want to run the pipe, the bigger the pipe you'll need to get the same water pressure you would get closer to your system using a smaller pipe.
Question: Most other multiple-barrel systems I've seen seem to be more of a serial configuration as opposed to your parallel setup. I'm still weighing the possible advantages/disadvantages of each (...unless you've already done that, as well, thus
your conclusion that this is the Perfect System!).
Answer: Yes I did. The downside of a series system is if one barrel gets plugged up for any reason, the flow from the system will cease. Also, in a parallel system your water pressure will stay more constant as the barrels empty, as apposed to a series system were you will notice
fluxs in water pressure due to the resistance in piping.
Question: I don't see how you provide for overflow once all barrels are filled to capacity.
Answer: Each barrel has an overflow vent at the top, I one of the photos shows this vent) which is then piped over and down its side. As each barrel fills at the same rate, they all overflow at the same time. In placing my system, I picked a spot where the water ran off from the
roof, so the runoff simply follows the old runoff from the roof.
Question: Pointing out that "Each barrel has an overflow vent at the top... which is then piped over and down its side" changes everything. However, I have concerns and motivation that differ from your own in that, in addition to harvesting, conserving and using the rainwater, I also
wish to redirect it away from the area and, as much as possible, prevent it from entering our 100+ year old, ruptured drain tile that will, otherwise, simply allow this water right into the basement. To modify your system to address this issue, my first thought is to merely vent each barrel at the top as you did but connect
them together in a manner similar to how you did the bottom resulting in just one outlet at the end that can be connected to a hose and used as I described. (I'm partial to the hose idea because the ability to move it around from time to time provides a way to prevent any one area from eroding, becoming overly saturated, etc.)
Answer: I like that idea, and that's what I would do if It were me. One thing to remember ... and it's a lesson learned for the Nuclear Power Industry, make sure you drill some 'Suction Breaker Holes' on the top of the vent pipe! If not, when the barrels fill and
start to overflow, they will start a suction action that if not stopped, will empty your barrels! All you have to do is drill a few holes on the top of the pipe and it will break any suction.
Question: I am considered either installing a diverter on the downspout that would allow one to manually direct flow either into the barrels or to the original drain tile or, I think a better more flexible and "automatic" approach, to have a threaded tap from the top of the "last barrel" that would, in turn, be
attached to a garden hose that could be run to a location or into any other container of one's choice.
Answer: Umm ... that's not as easy as it sounds. In a parallel system all the barrels fill at the same time, so they will overflow at the same time. You can pipe all the overflow into a common pipe and then run it out away for the barrels, but you need to vent each barrel or the
system will not fill. Again, as I noted above, I picked my location for the system based upon where the water currently ran off, that way I didn?t have to worry about where the overflow went, and the current trees and plants that depended upon it still get the runoff.
Question: Do you have an L rather than a T on one of the barrels?
Answer: Both end barrels are connected by a "L", the middle ones by a "T"For the middle barrels I connect each with a 'T' One end of each connects to the barrel on either side, the other to a pipe that is connected into a treaded fitting at the bottom of
the barrels which serves to both fill and drain the barrel. The vents are completely separate and not connected. I just pipe them over the top and down the side so the overflow isn?t ?slopping? all over the place.
Question: How long have you had yours set up and has any sort of maintenance been required?
Answer: Mine have been set up for over 9 years now, and only last year did the connecting pipe get clogged. All I had to do was disconnect it and the plug got shot out ... other then that, I've done nothing to it.
Question: Being a closed system I imagine that, as long as its filtered well enough upon entry, it shouldn't require much attention. I've been surprised at the amount of sediment that accumulates in my current setup but, if too fine a filter is used, it will restrict flow and eventually cause blockage. Using larger
pipes and draining from the bottom, I assume, helps in this area. The reason I ask is because I was considering attempting to conceal it by attaching some sort of screen or trellis to the front and wonder how permanent it could, or movable it must, be. As logical, practical, functional, and in our case almost necessary
something like this is, some folks just can't see past the "piles of old barrels all over the yard" and the comparisons to "living in a junkyard"!
Answer: Lets just say I set mine up and don't plan on taking them down for 20 year. Even if you do need to do maintenance, having everything connected by PVC makes taking a barrel out and fixing it a snap! Also, the only barrel that will build up sediment will be
the first or fill barrels, all the others are clean. That said, the PVC fitting at the bottom of each barrel will stick up 1 inch from the bottom of the barrels, so you can safely collect 1 inch of sediment before you have any issues ... which in my case took 9 years, and the screen I use on mine is a 1/4 inch mesh ... So I
wouldn't worry much! Just collect the water and enjoy!
Read
other stories by Michael Hillman
|