
Garlic is a centuries old culinary ingredient and home remedy cultivated and prized by the gardeners, chefs, and herbalists of many cultures and nationalities. Garlic is easily grown, has few pests, and has numerous varieties which vary in taste and mild to piquant intensity. It is estimated that there are hundreds of cultivars found around the world, and many of these
are available through catalogues or internet sources for local home gardeners. There are garlic experts who relish finding new varieties and travel the world to be the first to discover something new to share with garlic lovers.
Garlic is divided into three broad categories: Elephant, Soft Neck, and Hard Neck. The biggest distinction between these three types of garlic is where they can be grown as suggested by the growing regions determined by the United States Department of Agriculture (USDA) climate zones. Elephant and Soft Neck garlics are hardy in mild winters between Zones 5-8, and Hard
Neck garlic tolerates and prefers cold winter conditions in Zones 2-6. As a fall planted bulb crop, all garlic needs some degree of cold temperature during the winter, much as flowering bulbs do planted in the fall for spring growth. Elephant and soft neck varieties can withstand sequential cold nights below freezing during winter, but they do not thrive in areas
subjected to prolonged temperatures below 0-10 degrees F. Hard Neck varieties are hardier because they are able to endure many below 0 degree winter days over the course of the season.
 Since garlic is planted in the fall, now is the perfect time to think about adding garlic to your gardening repertoire. A decision to grow garlic is not limited to its climate needs, but also relates to a gardener’s understanding of garlic qualities and uses. Garlic is considered a necessary food to
some, an essential flavor enhancer to others, and a gardening harvest to gift to family and friends for many. A guideline for determining how much to plant is based on the planted clove to its developed head ratio. Literally, planting ONE CLOVE of garlic yields ONE HEAD of garlic. So if you plant 10 cloves 5 inches apart in a 4 four foot row in October of this year, you
will have 10 heads of garlic to harvest in late spring or early summer of 2016. Elephant Garlic varieties are generally mild tasting and develop only 4-6 large cloves. Most Soft Neck and Hard Neck garlics generate up to 20 cloves on the new heads. Sounds easy, right? Every clove planted provides a new whole head of garlic for your use, so it has a high yield on
investment.
Since garlic is planted in the fall, now is the perfect time to think about adding garlic to your gardening repertoire. A decision to grow garlic is not limited to its climate needs, but also relates to a gardener’s understanding of garlic qualities and uses. Garlic is considered a necessary food to
some, an essential flavor enhancer to others, and a gardening harvest to gift to family and friends for many. A guideline for determining how much to plant is based on the planted clove to its developed head ratio. Literally, planting ONE CLOVE of garlic yields ONE HEAD of garlic. So if you plant 10 cloves 5 inches apart in a 4 four foot row in October of this year, you
will have 10 heads of garlic to harvest in late spring or early summer of 2016. Elephant Garlic varieties are generally mild tasting and develop only 4-6 large cloves. Most Soft Neck and Hard Neck garlics generate up to 20 cloves on the new heads. Sounds easy, right? Every clove planted provides a new whole head of garlic for your use, so it has a high yield on
investment.
Taste is another choice factor in what to plant, and that decision is interesting because a grower can select over a range of mild to strong taste with different levels of bite and tang. This allows for planting several kinds of garlic, and enables the gardener over a few growing seasons to learn which varieties are preferred for flavor characteristics, and which ones
grow best in local climate and soil conditions. It can be a family activity for everyone in a household to read over the garden catalog descriptions of garlic varieties and pick ones that have an interesting name, represent a certain regional heritage, or sound like something that would become a charming gardening tale of adventure. With varietal names like: German Red,
Mexican, Transylvanian, Mchadidzhvari, and French White, imagine how else a source list may tempt a gardener.
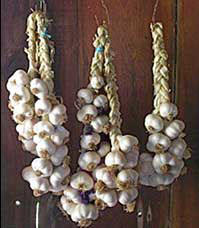
Creativity and art may also inspire a gardener to grow garlic. Plant materials have a long history of being used for their particular adaptation for displaying one’s skills and ability using vegetative matter. Some varieties of garlic are planted as much for their decorative aspects, as for their edible properties. Soft neck garlics are excellent for making braided
wreaths and swags. A sub-category of Soft Necks called Silverskins are the varieties to consider. Nootka Rose, Silver Rose, and Silver White are especially recommended for making artistic items for gifts and home. Extensive information is available in craft magazines and internet videos to assist the novice learn how to use garlic plants as an art medium at the time it is
harvested.
First garlic heads should be sourced from a reliable grower, catalog, garden center, or garlic growing friend. You should not use grocery store bought garlic for clove planting material. 75% of garlic sold in U.S. grocery stores is from foreign countries, and before shipping, it is often bleached to aesthetically appear bright white, and treated with fungicides,
hormones and/or herbicides to prevent sprouting in shipment and produce department displays. Grocery store garlic has a high probability of not growing in a backyard garden.
With that caution in mind, it’s time to decide where to plant garlic in your yard or garden this Fall between early October and mid-November. Garlic requires at least six hours of sun daily; a pH of 6.5 to 7.0, and well-drained, fertile, loose soil. A soil test would determine what part of your space is best for this crop. The garlic bed can be simply, a short row of a
dozen cloves; a 4-foot square which could hold 32 cloves; or any configuration that would accommodate the total number of cloves planned. Planting space is determined by how many cloves to plant in row depending on the length. If more than one row is planted, keep the rows 12 inches apart from each other.
Garlic can be planted either directly into a garden space or in a raised bed with good gravel base drainage, and at least 8 inches of top soil. When preparing a space for planting: loosen the soil, remove any large stones, and spread and work into the soil several inches of aged garden-waste compost, well-decomposed cow or poultry manure, or aged mushroom mulch. These
amendments improve soil structure. Along with these soil enhancers, and based on soil test results, the recommended lime and general fertilizer comprised of nitrogen, phosphorus and potassium can be mixed in the soil too at this time to increase soil fertility. Also, have available the material ready to mulch the bed, after you plant the cloves. Shredded leaves, rotted
pine needles, newspaper or shredded paper covered with straw, shredded leaves, or other organic materials will be necessary to protect the growing plants from heaving during cold weather and from weed growth when the ground warms up in the spring.
Planting should be timed to when the nights are at or slightly below freezing. Warm days allow the cloves to develop roots, and as the clove grows it stores energy for winter not unlike a tulip or daffodil bulb. It needs the cold weather to continue growing and maturing in the spring. With your planting plan at hand, lay out your rows using a stretched string attached
to stakes on each end. With short rows, you might find it easier to use a pole or long stick as your planting guide, and a ruler to help you space the cloves in the row, and to determine the space between the rows. If you are planting several varieties keep them in their own row, and have markers ready to put in as you plant to identify each variety. Plant the cloves
pointy side up, 6 inches apart, and fill in the entire row with its cloves, and them cover the cloves with soil.
Mulch the entire bed when everything is in place, marked and covered. It is good to mulch the aisle space between each row with 3-4 thicknesses of newspaper cut to span the 12 inch space, and cover that with shredded leaves or other suggested mulches as you go to prevent blowing paper. The purpose of mulching the entire bed is to protect the soil and growing bulbs
heaving with freeze and thaw periods, and to prevent light penetration which allows weed seed germination and weed growth which can interfere with garlic growth in the spring. Mulch should be applied to a depth of 4 inches, and the character of the mulch should be light in weight, so that the plant can penetrate the mulch as it grows. Cloves may develop some top growth
before winter sets in, but this will not harm the develop of the bulb and plant in Spring.
But, most importantly, you are done for now. You and the garlic can “hibernate” until next April, and then you can watch the garlic grow, learn about scapes you can harvest early and use in the kitchen, and be ready for the last steps of garlic growing: monitoring spring and early summer growth, harvesting, curing, and storing garlic for personal use, gifts, and your
own bulbs to save for replanting in the Fall of 2016.
Read other articles on growing herbs or vegetables