|
Five Step Plan for Asparagus Planting
Bill Devlin
Adams County Master Gardener
 Recently the Adams County Penn State Master Gardeners instituted a new method of choosing topics to write about for our weekly columns.
At the end of each article we invited the public to submit proposed topics. The first one I received concerned Asparagus, a plant that I have personally grown previously. Recently the Adams County Penn State Master Gardeners instituted a new method of choosing topics to write about for our weekly columns.
At the end of each article we invited the public to submit proposed topics. The first one I received concerned Asparagus, a plant that I have personally grown previously.
"Anything and everything about asparagus! (especially how to
grow those nice fat stalks)" is the request that I received.
Reviewing the bidding, so to speak, asparagus is a perennial that takes several years to reach its potential. That’s no excuse to not undertake the journey, just the facts.
The first two years are already underway as the roots you will seek out in February – March of 2011 will be two year roots.
Step One is acquiring the roots to plant. This is a challenge as stores are quickly sold out as are the internet sites that I have checked, so START EARLY. All caps is sometimes considered
impolite and is equated to screaming, but that’s why I did it! You have to get in there early or you will be left holding an empty bag.
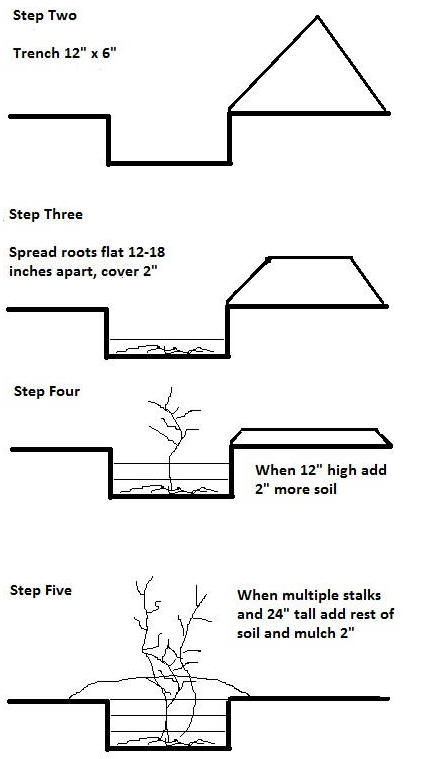
The next 4 steps are illustrated in my Microsoft Paint stylized sketch.
Before I get into that, I want to address the ‘nice fat stalks’ request. By fat stocks I think what is probably meant is the ‘Jersey’ varieties that are particularly hard to find in stores
and reemphasizes my START EARLY shout out. If you want Jersey (and there are several varieties of them) and you can’t find them in local stores, try the internet. If you are not focused on ‘nice fat stalks’, Mary Washington
is the variety that’s most common in my experience.
An interesting aside is the fact that asparagus stalks have gender, Jersey varieties are frequently sold as male only to eliminate the tendency to spread from seeds.
Back to my 4 step sketch. Step Two is dig the trench 12" wide and 6" deep, This will give the growing roots easy going to spread through relatively loose soil. Pile the dirt adjacent to the
trench for easy access when covering later.
Step Three is spread the roots flat 15" – 18" apart. Various authors give various distances but for ‘fat stalks’ not being crowded is a plus. Cover with 2" of soil. Some say 3" but I like to
take baby steps and spread a little 10-10-10 fertilizer, about a teaspoon per plant on top of each layer as I go. Don’t put the fertilizer directly on the roots, make them work for it.
Step Four is results based. When a single stalk appears and is about 12" high, add another 2" of soil and another teaspoon of fertilizer over each plant. Do NOT bury the stalk.
Step Five is also results based. Additional stalks will appear from each successful root set, when you get two or three and the tallest stalk is about 24" high, add the rest of the soil you
excavated, a little more fertilizer and about 2 inches of mulch.
Needless to say, after each rain (or heavy sprinkling if it doesn’t rain) you are pulling the weeds out including the roots.
The second year you can grab a few shoots in April, but not for longer than two weeks. Year three you are in the asparagus business. I am not including recipes as the recommended web sit has
them and besides, I like to eat them raw.
Read other articles on growing herbs or vegetables
Read
other articles by Bill Devlin |